DIY Faux Wallpaper Bathroom Makeover
Our half bathroom makeover is finished, and I'm so excited to share the results with you! While I'm happy with all of the changes my favorite is the DIY faux wallpaper. It was super simple and totally revamped the room at virtually no expense. I'm spilling all of the details below. Thanks for reading. <3
I love a good makeover. Especially when that makeover costs less than $300 and totally transforms a room. Ever since we updated the backsplash in our kitchen it was glaringly obvious that the interior design of this bathroom was not exactly our style. I've been on Mission Remove All Beige and Brown from our house ever since moving in. This was one of the last rooms with heavy browns, wood, and bronze. Now that all that brown is gone this little bathroom makes me SOOO happy every time I see it. And as my husband pointed out that's frequently since I pee "every 20 minutes". Thanks, Love. I like to hydrate, ok?
-
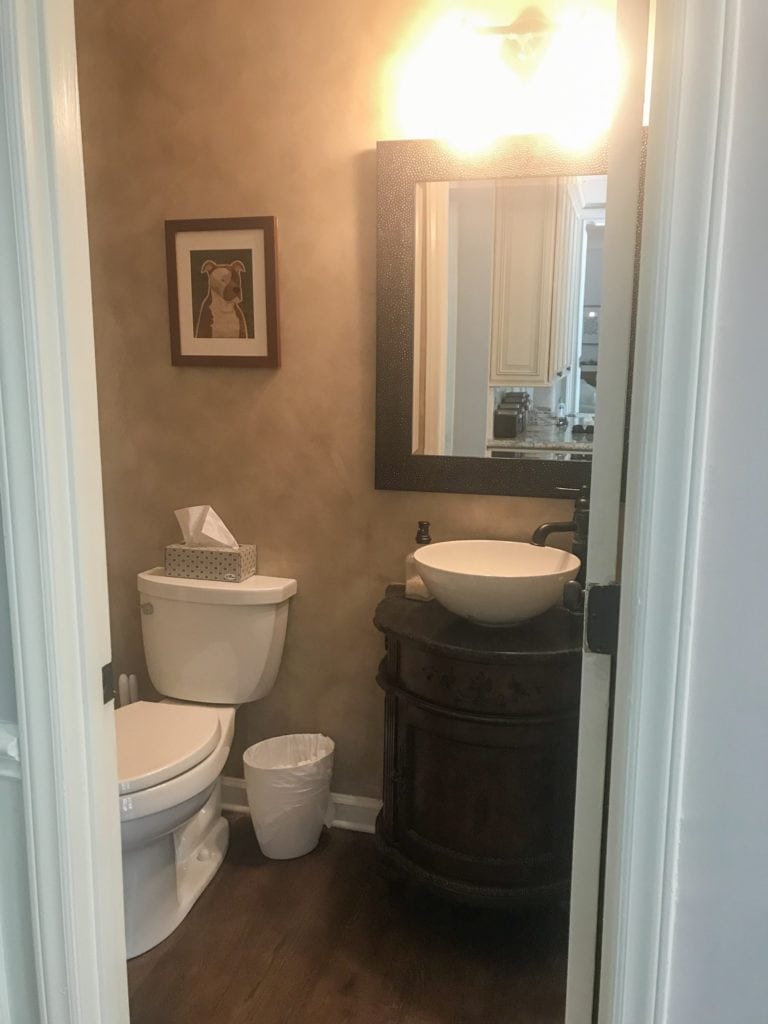
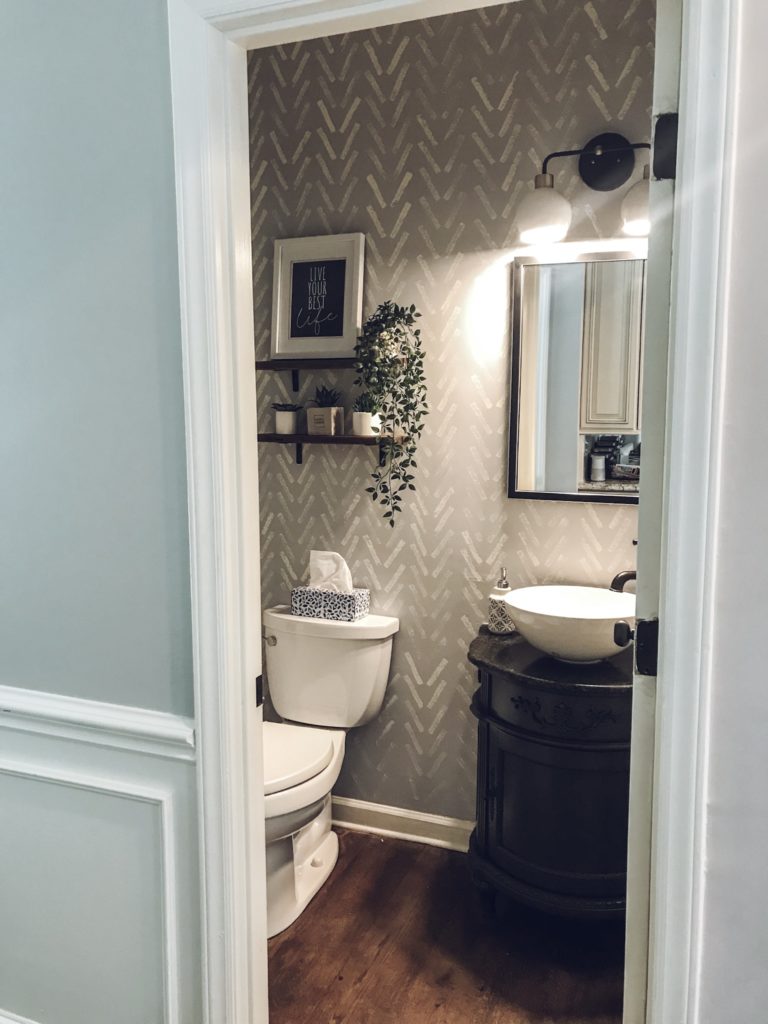
Before -

After
I was excited for this tiny room makeover, because I think half baths are the perfect room to have a little fun on the walls. But man - decisions! I'm not a procrastinator, but it took me a while to finally start this project. Why? I couldn't decide if I wanted to invest in removable wallpaper or a stencil. And then within those options there were soooo many cute prints.
Conveniently, the weekend I was trying to make a final decision a new (and super inexpensive) idea popped up on Nesting with Grace's Facebook page. A member named Julie posted about a cute print she made simply using a sponge glued to a paint stick to create a DIY faux wallpaper. Brilliant! It sounded do-able. And worst-case I could paint over it and go back to wallpaper or an actual stencil. I figured there was nothing to lose. Side note: if you're looking for home decor inspiration and tips I highly recommend joining that Facebook group for a supportive community full of amazing ideas.
Easiest DIY Faux Wallpaper
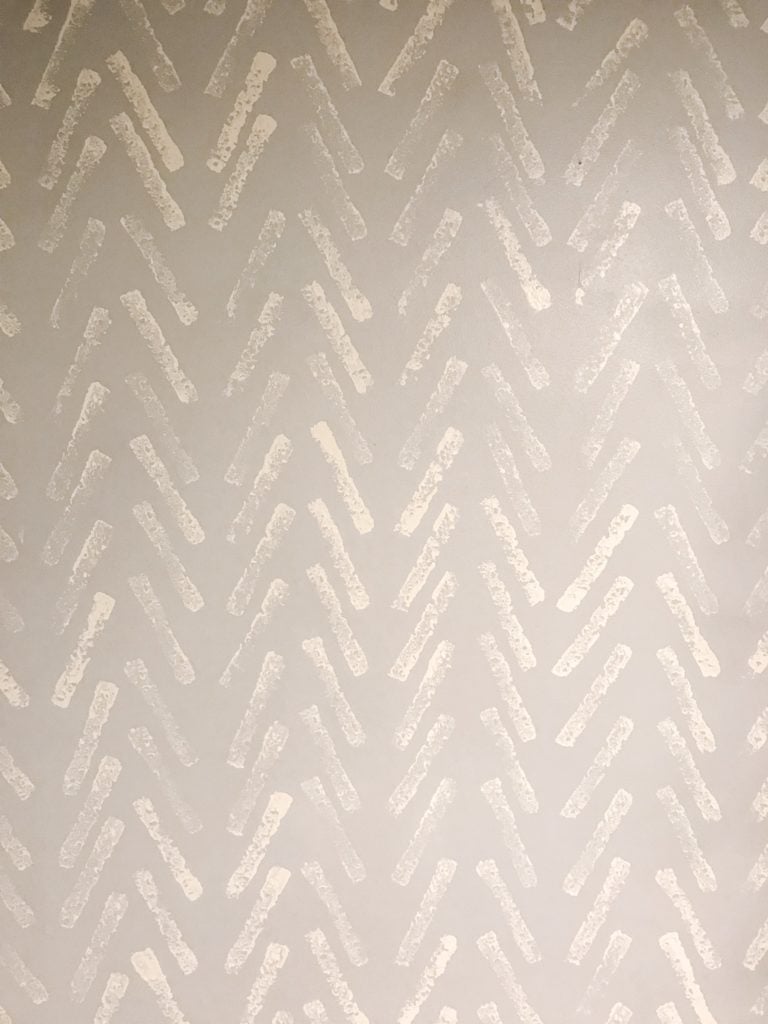
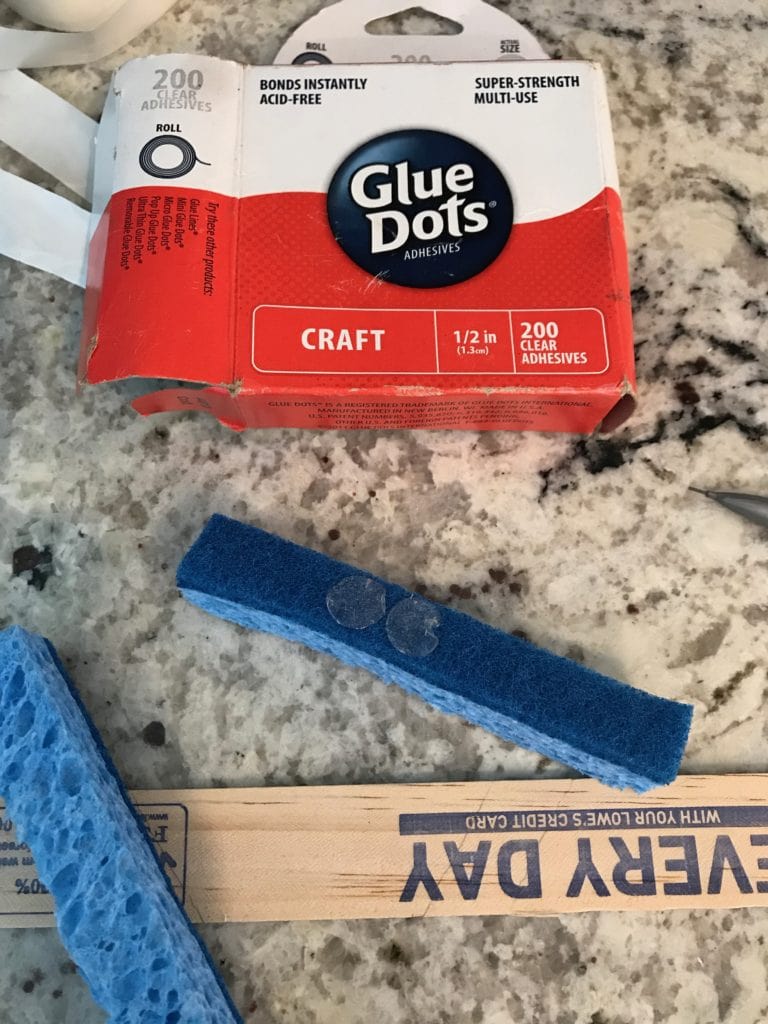
So let's talk about the details of this DIY faux wallpaper technique. All you need is a kitchen sponge and a paint stick to create the print. That will cost you about $1. Definitely a better deal than wallpaper. None of my home projects ever go smoothly so even this ended up being a little delayed. I made a trip to Lowes just to get a paint stick. Guess what they were out of? Paint sticks. All of them. Pretty sure that has never happened in the history of Lowes. Except for the one day that was literally the only item that I needed. Funny, universe... Anyway, they were replenished a few days later and my project resumed.
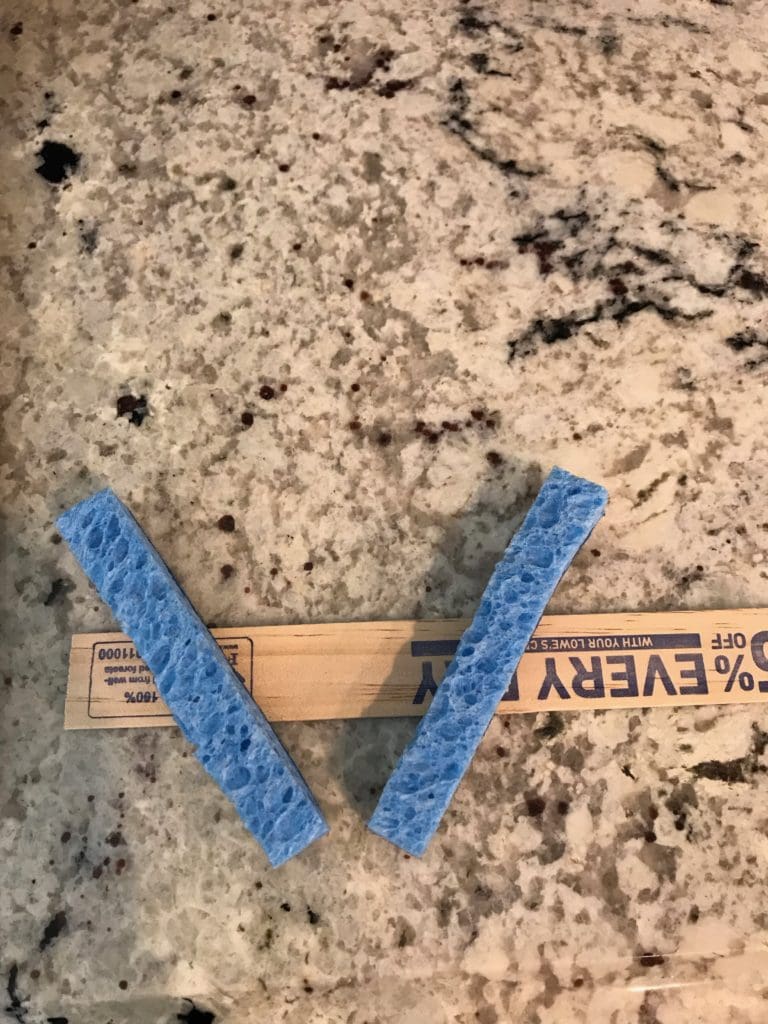
The original sponge technique created horizontal lines, but I knew I wanted to create a V shape to mimic some of the wallpaper prints I had been attracted to. Here are the easy steps for this DIY faux wallpaper technique:
- Cut two pieces from a kitchen sponge. If you don't want the texture of little sponge holes then a magic eraser would probably work better. I just used what I had and kind of like the unique look.
- Adhere the sponges to a paint stick at the desired angle. I happened to have little glue dots that worked perfectly, but I'm sure you could use actual glue, as well.
- Pour a little bit of paint into a tray and dip the sponges into the paint. Scrape off excess paint before applying to the wall. I quickly learned that less paint works better otherwise it will start to drip.
- Continue to press the print on the wall until the print becomes faded. Then repeat!
- Don't step back and look at your progress when you're just getting started. Otherwise you'll probably think it looks ridiculous and stop. I did this and was tempted to abort mission. However, I decided to at least finish one wall and once I did I was happy with the results.
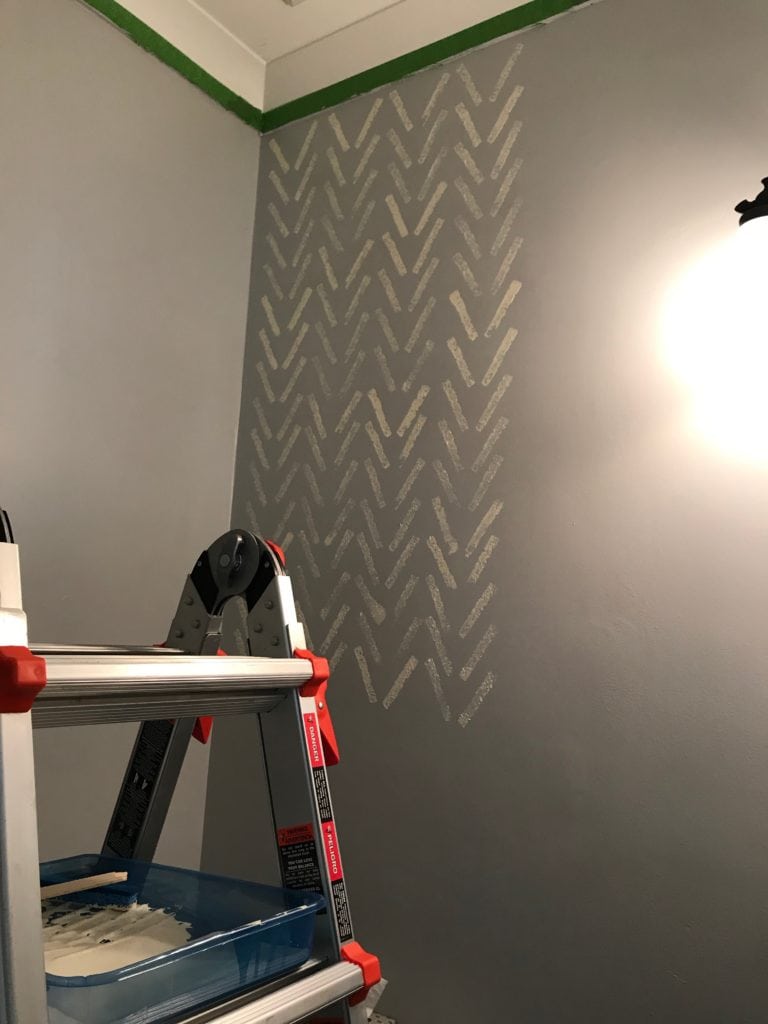
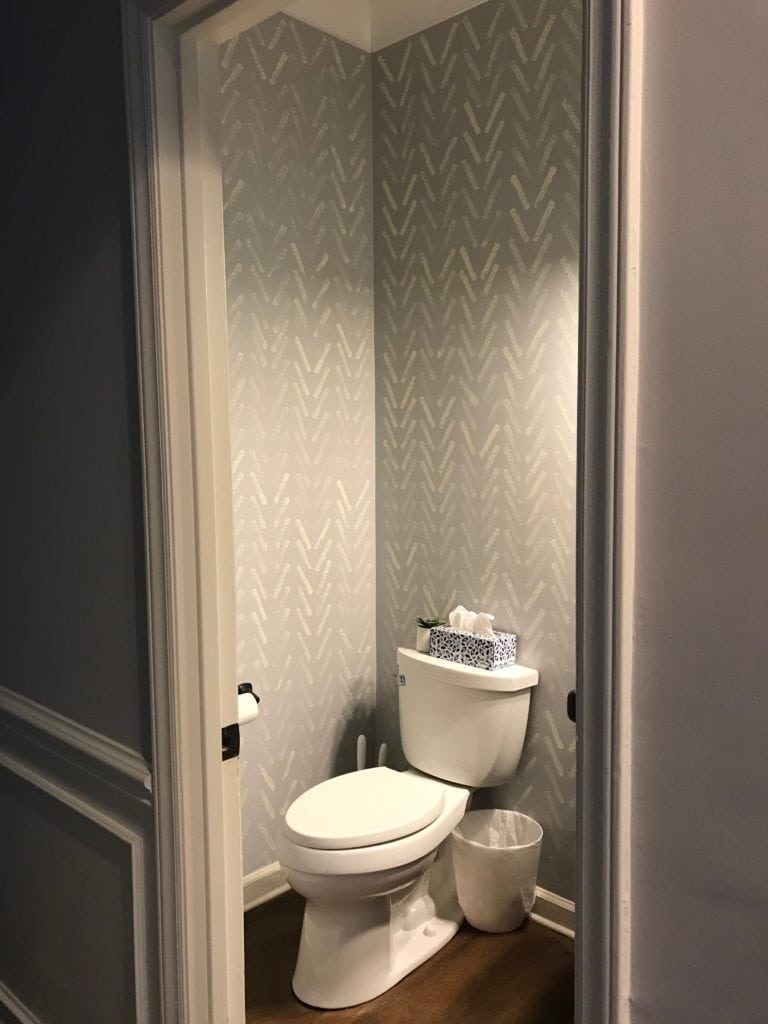
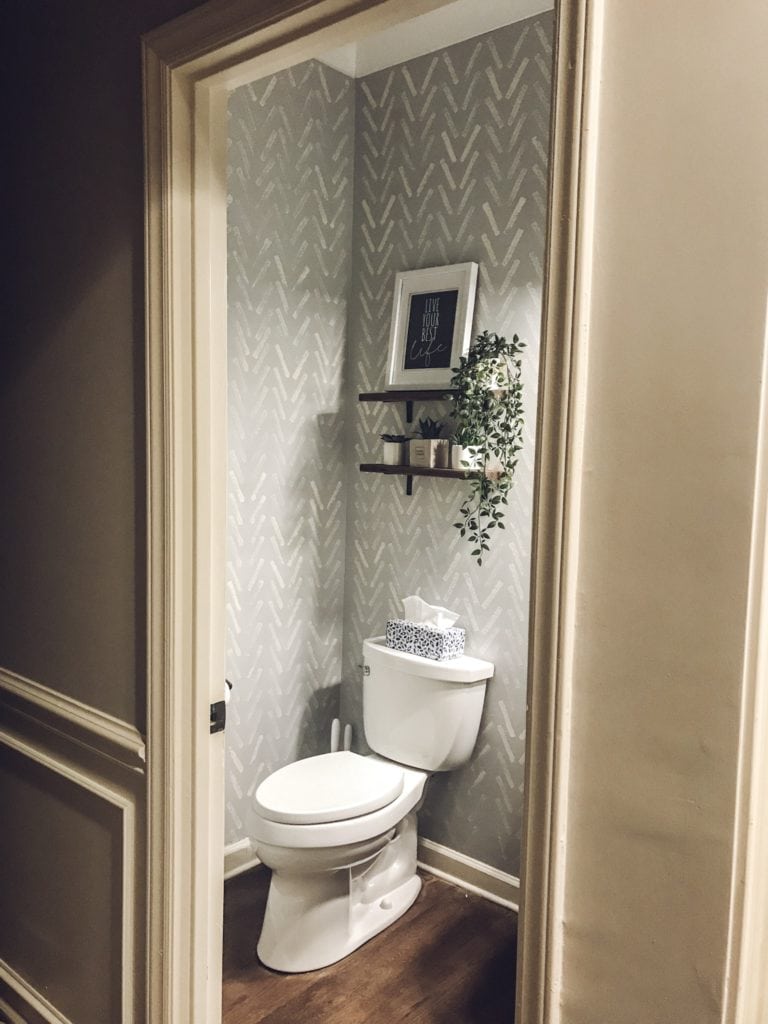
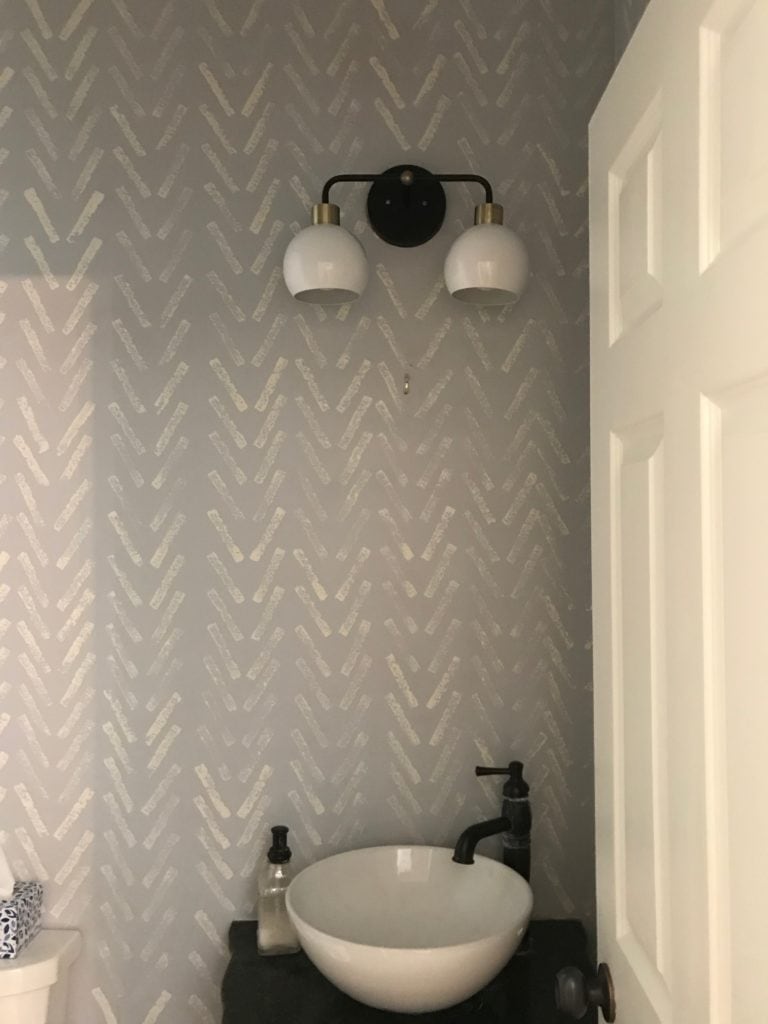
I used paint that I already had on hand. That meant this DIY faux wallpaper cost about $1 and a few hours of my time. The hardest part was fitting our Little Giant ladder into this tiny room. That ladder can do amazing things, but it was still pretty cozy with the two of us (yes I mean the ladder and me). The wall color is Sherwin William's Agreeable Gray and the print is Valspar's Presidential White.
Quick Vanity Update
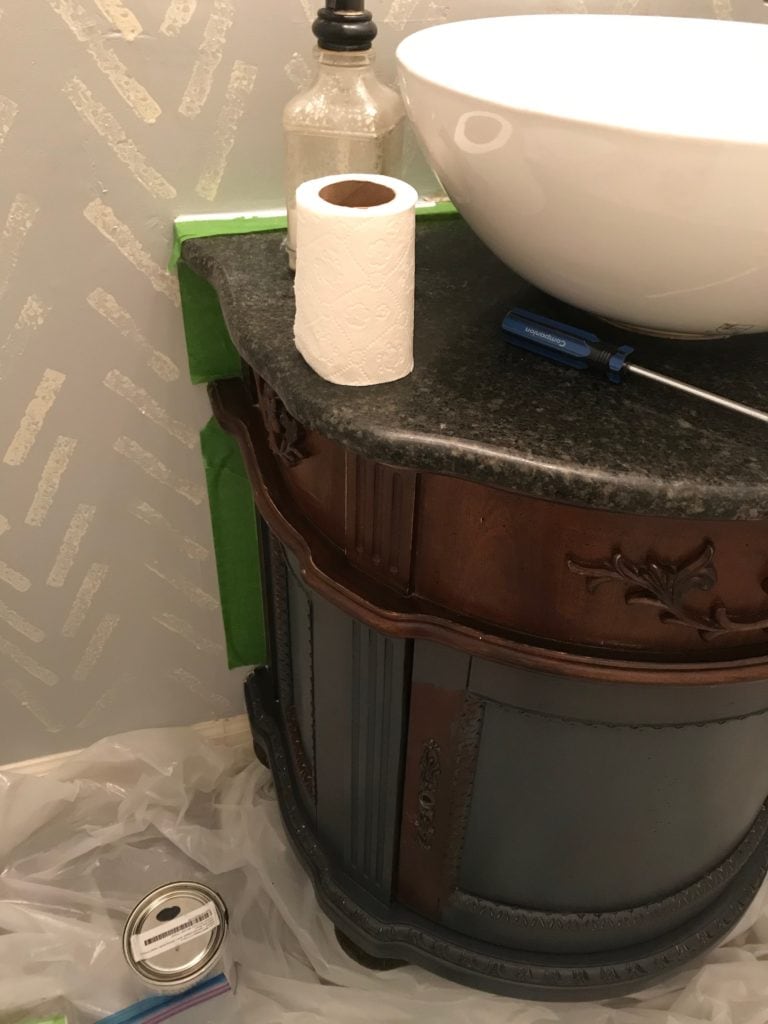
I'm not a fan of the bathroom vanity, but I wanted to keep this project simple and inexpensive. I wasn't interested in dealing with plumbing or investing in a new vanity, so paint to the rescue once again! I used Valspar's furniture paint in Chimney Smoke to try to hide the ornate wood portion of the vanity and to draw more attention to the sink portion that I like. The vanity still isn't my favorite, but it works for now. I love furniture paint because it makes projects like this so simple. I dusted the vanity off, lightly sanded it, and then painted. It probably took an hour or two. Most of that time was trying to paint around all of those little details that I was tempted to chip off.
$13 DIY Shelves
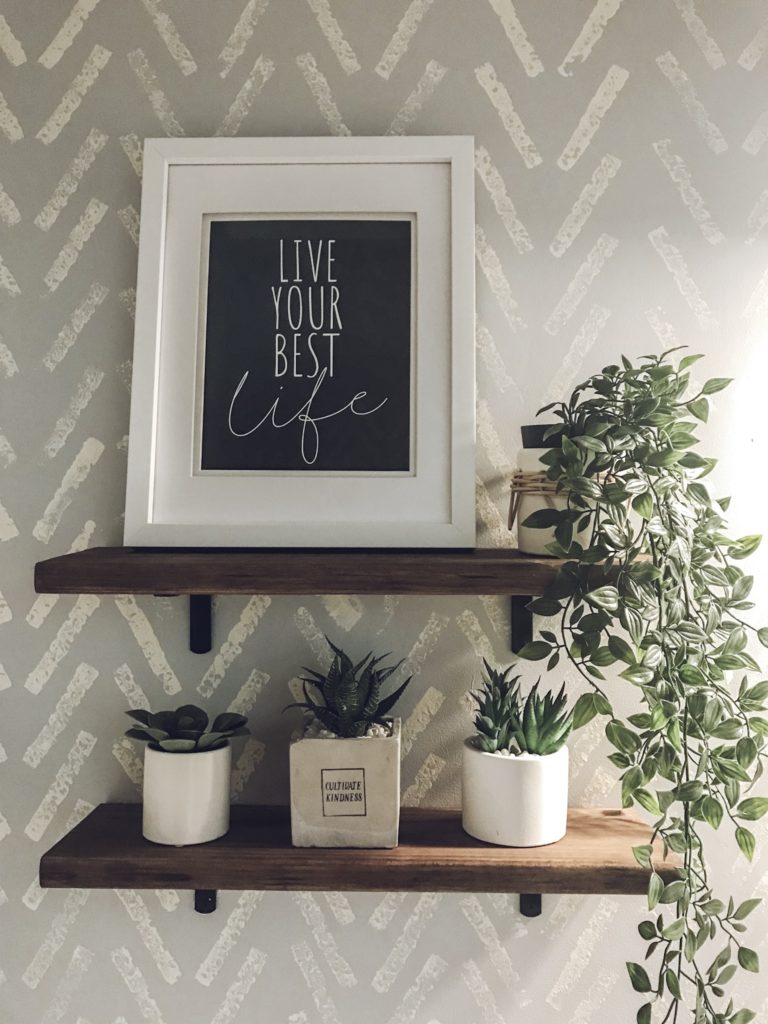
I knew that I wanted to add shelves to the room. Since it's a half bath I didn't need any storage space, but I did want to add a little life into the room. And by life I mean fake life. Remember what happened to my fiddle leaf fig tree (RIP, poor thing..)? This room doesn't have any windows and even if it did let's be real...the inevitable shriveled up succulents dropping their limbs that would result under my care isn't super cute.
Since I wanted a certain size and look for the shelves I figured it would be easiest to just DIY them. I turned to the same technique I have used for the top of my sofa table and DIY desk top for the wooden portion. All I needed was a 1 x 6 piece of lumber from Lowes that was about $7. I chose that piece of lumber pretty much just because I liked the appearance of the grain. There are probably better ways to choose lumber for projects than that, but I have zero tips for that. Also I just spelled lumber "lumbar" three times in a row, so I'm clearly more veterinarian less carpenter.
The one tip I do have is to utilize the complimentary wood cutting they offer at Lowes. It saves a lot of time, and it was an easy way to quickly get the 20 inch pieces I was after. It also made it so I could fit the board into my car, so that's always nice. Then I simply sanded the boards, wood conditioned, and stained as described in this post. I love this trick for instantly transforming a cheap basic piece of wood into something cute.
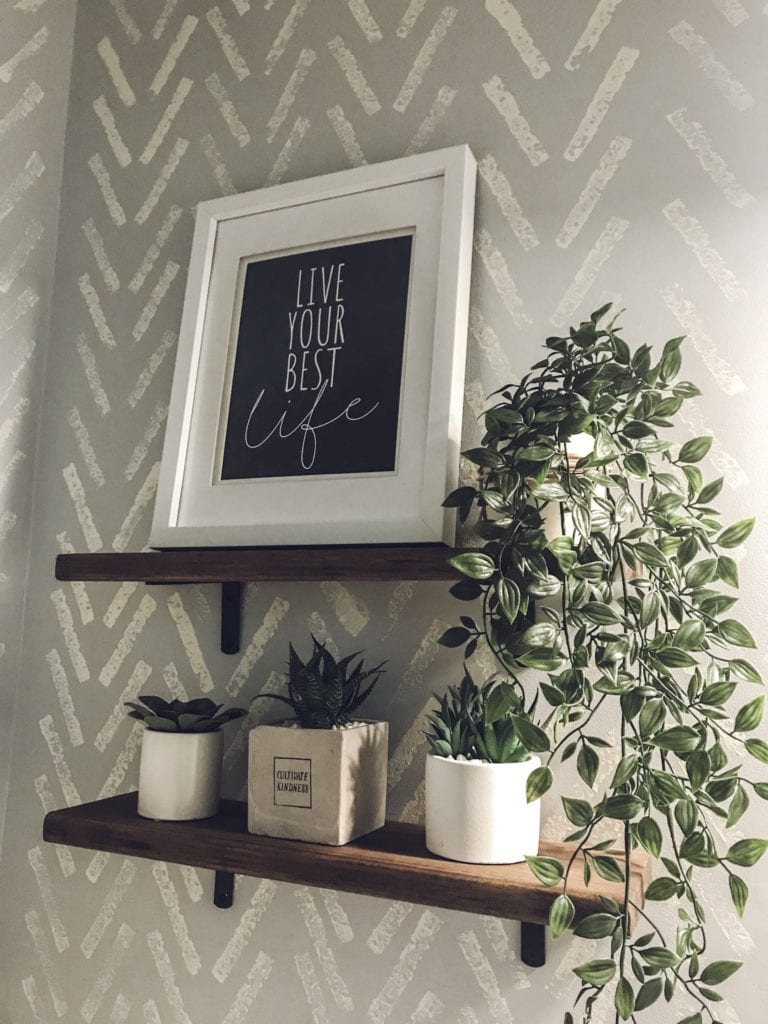
I found these brackets on Amazon for $6 and they were exactly what I was looking for. They are even sold as a pair, so perfect for a couple of small shelves! After that, I had fun shopping for my faux plants. The hanging plant is one that I already had from Ikea. The small succulent on the bottom left is from Target and the two others are Home Goods finds.
I knew I wanted to add a little height to the shelf with a framed print. I love having little messages around my house as a reminder to enjoy life and be mindful. It's very easy for me to get wrapped up in future plans and current stresses, and this "Live Your Best Life" print is a reminder to work towards enjoying as many moments as possible in this one life we're given. I created the print and had it printed at Walgreens for about $2.50. If you'd like a copy of the print, please subscribe to my blog and I'll send you a free printable as a thank you.
The frame was another Home Goods find. Important to note: I went to Home Goods and ONLY purchased the faux plant and frame. Miraculous, right?
Light Fixture
-

Old light fixture -
New light fixture
Since everything up to this point was extremely low budget I decided to splurge a little on upgrading our light fixture. And by low budget we're talking under $100 for everything including the furniture paint, shelves, faux plants, frame, print, and new soap dispenser. Since I wasn't changing the vanity I was excited for this upgrade. Matt installed it and laughed after saying he never would have noticed it was different. Husbands are such a treat sometimes. Regardless, the light is the Young House Love Bubble Vanity light from Shades of Light, and I love it.
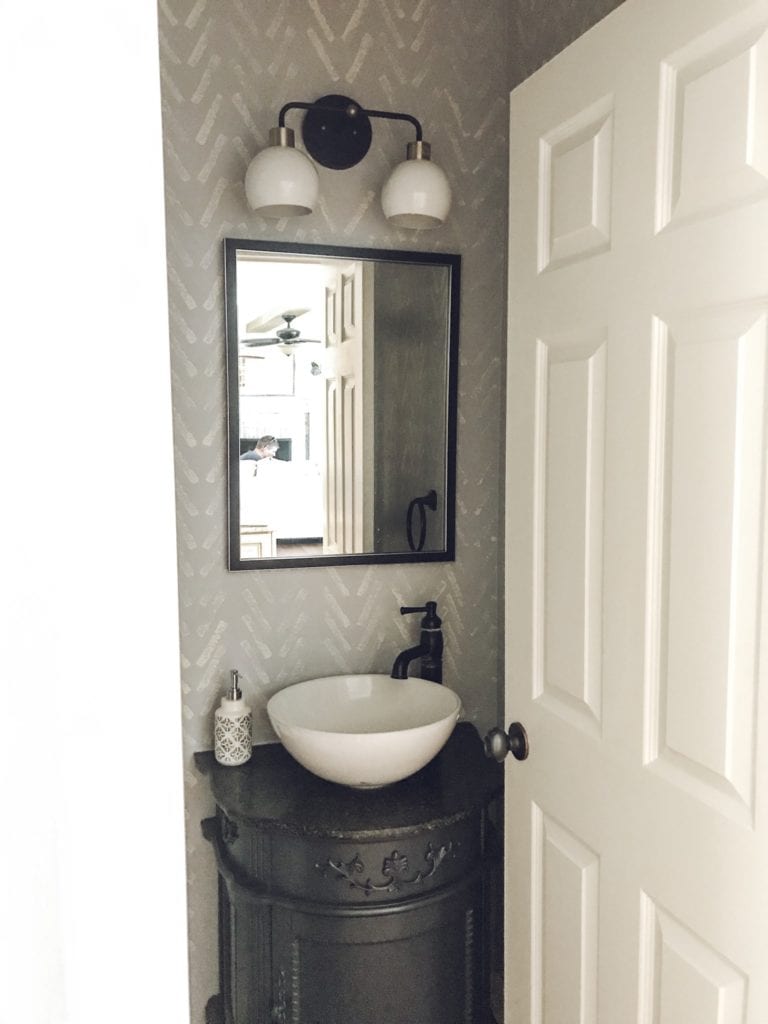
Mirror
I was also excited to swap out the mirror. Little changes like that in the home are the best because it provides instant gratification unlike kitchen backsplash. Obviously still have a little PTSD from that...
I visited Home Goods a couple of times hoping to find a fun mirror, but didn't find any that I loved. I did, however, find a floor length mirror that was perfect for one of our guest rooms. That guest room happened to have a smaller mirror that we had inherited from Matt's aunt, and I realized that it would work perfectly in the bathroom. Yay for shopping in your own home! That was a total win since I was able to tackle two home upgrades at once. All of our guests are the best and they deserve to be able to check out their entire outfit when they visit.
It's amazing how a simple inexpensive makeover can bring so much joy every time you see your new room. The faux wallpaper technique is so simple and the perfect way to add a whole new feel to an old room. If you have any questions about the faux wallpaper technique or any other details in this post, please don't hesitate to ask in the comments!
Paint Colors and Products Used
- Wall color: Sherwin William's Agreeable Gray
- Accent color: Valspar Presidential White
- Vanity: Valspar furniture paint in Chimney Smoke
- Shades of Light Young House Love Bubble Vanity Light
- Target Soap Dispenser
- Target artificial succulent
- Ikea artificial potted hanging plant
- Shelf brackets
- Shelves - Lowe's 1" x 6" lumber sanded and stained using this technique
- "Live Your Best Life" Print - subscribe to instantly receive a free printable copy!
FYI: Some of the links included in this post are affiliate links. That means as an Amazon Associate I earn from qualifying purchases (theoretically, haha). I only link to products that I own and love. Thank you for stopping by and for your support. <3
12 comments
Leave a comment